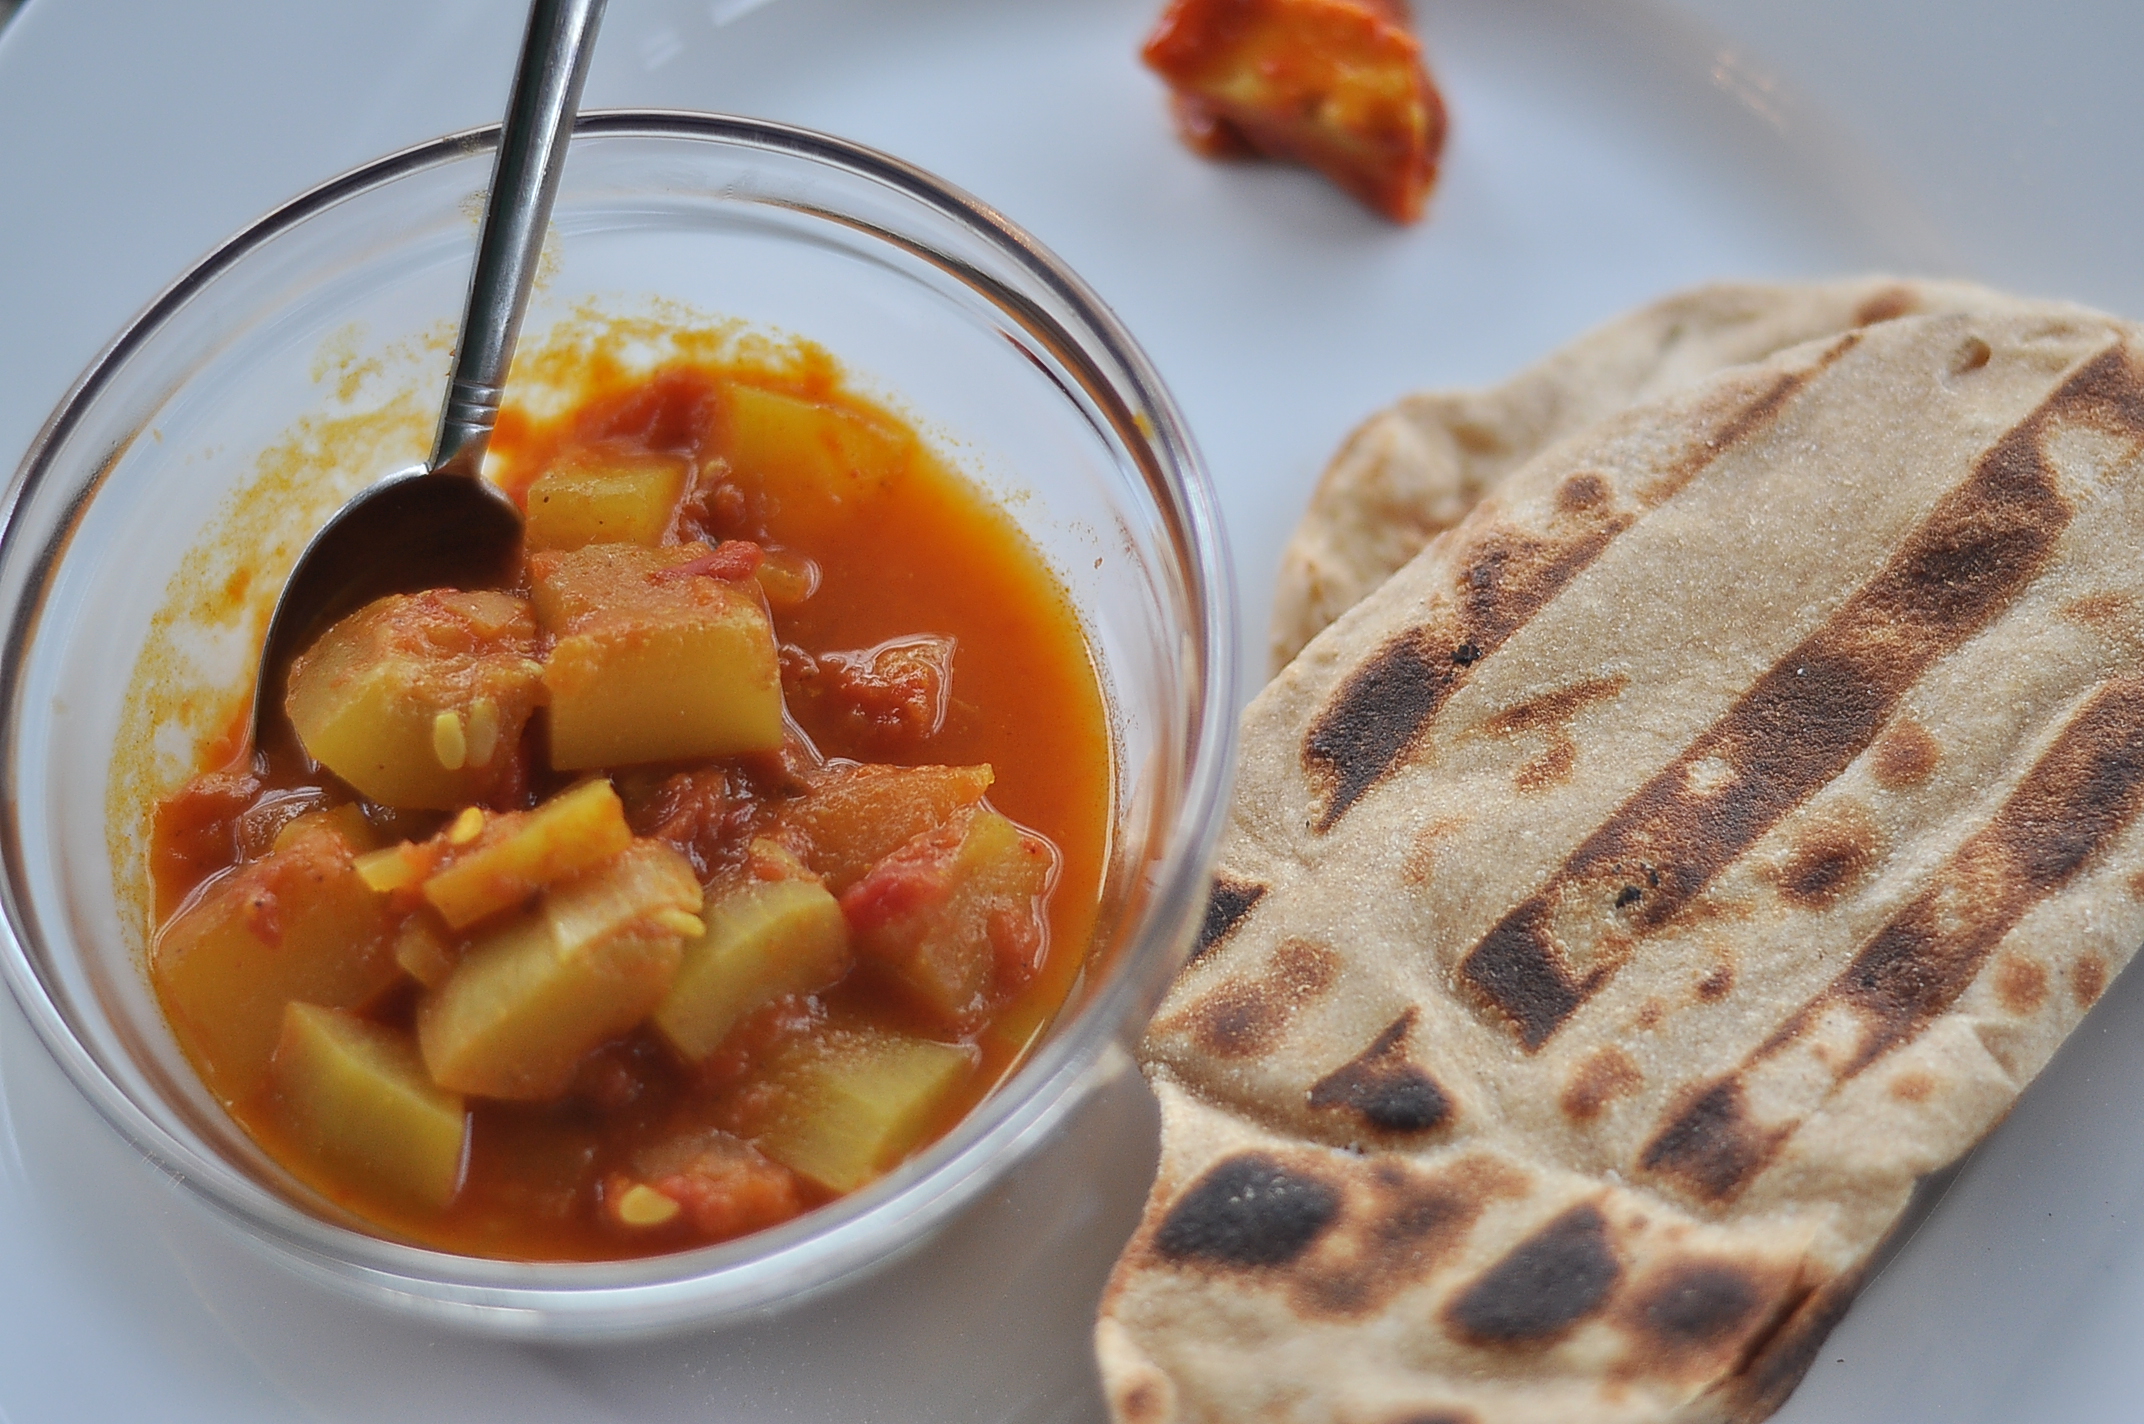
Category Archives: Recipes

Paneer Pizza with Tandoori Masala

Paneer Pizza with Tandoori Masala

Paneer Pizza with Tandoori Masala

Indians know their food. Restaurants with mediocre (read that as not finger smackingly good) fare tend not to last very long. While there is a slew of trendier places that have opened up in the last couple of decades, where people go to see and be seen, food is still front and center and places simply can’t survive on the glitz. And so it is in this mix, that Mickey D’s, Pizza Hut, Domino’s and their ilk have decided to test their mettle. Without exception, ALL of them have had to come up with a different, some might call tastier, menu for India. And the menu is good, in fact as fast food goes, it is great. Our family looks forward to it every time we visit India. After all, where else would you find dishes like McAloo Tikki Burger (a Potato based patty Burger), Kathitto (a Kathi Roll sold by Taco Bell) and Rawalpindi Chana Paneer Pizza.

While I have been able to replicate, or come close to, getting my Burger and Kathi Roll fix in the US, making a good Indian-style Paneer Pizza has eluded me. I have tried and failed in the past (click here).  So this time around I kept it simple. I started out making a standard Margherita (see here). I started with some cold fermented dough and some homemade Tomato-Basil Sauce. Then I added some minced garlic, some chopped tomatoes, Paneer, and Fresh Mozzarella. Sprinkled the whole thing liberally with some Tandoori Masala powder(available in Indian grocery stores) and baked it on my Baking Steel.

When it was done, some more Tandoori Masala powder, freshly ground sea salt and a topping with chopped Basil completed the Pizza. It was a beautiful thing.

Leave a comment

Filed under Indian

Butternut Squash in Fresh Green Curry

Butternut Squash with Fresh Green Curry

Butternut Squash with Fresh Green Curry

Given our love for spicy food, Thai cuisine is a big hit in our house. It is, however, somewhat hard to find truly vegetarian Thai food since most restaurants use either fish or oyster sauce. So we have taken the DIY route and cook what we crave. The excellent “Real Vegetarian Thai” by Nancie McDermott was a serendipitous find and has been our go-to resource for many years. I have yet to find a bad recipe in that book.

So this year, when we decided to go the Thai route for Thanksgiving, “Real Vegetarian Thai” was eagerly sought out and consulted. The menu after much debate was – Lettuce Bites as an appetizer, Tom Yum soup as a first course, Butternut Squash Curry and Red  Curry Vegetable Stir Fry as the main, served with boiled rice. The first two were dishes we had made before, the latter two, we hadn’t. Everything turned out really well.

It was quite a feast and there was much singing and dancing by the fire that night.

The one dish that was exceptional for me was the Butternut Squash curry. It was surprisingly simple to make and full of flavor. Something that one can whip up in a jiffy on a cold night. With the onset of winter I thought I’d post it. Here goes.

INGREDIENTS (for 4-6)

1 small butternut squash – about 1.5 pounds

2 Tbsp coarsely chopped shallots or yellow onion

1 Tbsp coarsely chopped garlic

1 tsp peeled and coarsely chopped ginger

2 fresh green jalapeno

3 Tbsp + 1/2 cup water

3/4 cup coarsely chopped cilantro leaves

1 can unsweetened coconut milk

1 sp sugar

1 tsp salt

1/4 cup fresh basil leaves

STEPS

  1. Trim the top and bottom of the butternut squash. Peel the thick skin. Scoop out the seeds and cut into 1 inch cubes. Set aside.
  2. In a blender – combine shallots, garlic, ginger, chilies, 3 Tbsp water and cilantro – blend till you have a smooth paste. Add additional water if needed.
  3. In a saucepan, add about half the coconut milk and bring to a gentle boil over medium heat, cook until it releases its sweet fragrance – about 3 minutes.
  4. Add the curry paste (from step 2) and cook for 2 minutes, mashing and scraping into the coconut milk.
  5. Add the remaining coconut milk, 1/2 cup water, sugar, salt and butternut squash.
  6. Raise to high heat and bring to a rolling boil. Reduce heat to maintain a gentle boil and cook till the butternut squash is cooked – about 15 minutes.
  7. Serve with boiled white rice.


Leave a comment

Filed under Thai

Quinoa Vegetarian Chili

DSC_5141

We love Chili in our house. It is tasty, easy to make, healthy and substantial. Being crunched for time last week, it was Chili time again. Usually, when we eat Chili, it is with some kind of bread on the side. This time though, I decided to do meal-in-a-bowl and decided to throw in a few fistfuls of quinoa right at the end and let it cook in the Chili. Quinoa, for those of you who don’t know is a grain from South America that is considered by many to be a super-food. It contains heart-healthy fats and anti-oxidants and is considered a nutrient-rich grain.

It tasted great and made for a complete meal in a bowl. Here is the Chili recipe (click here). You can experiment with the amount of quinoa you want to add. You may have to add a little extra water to make sure the quinoa cooks properly and the Chili has the right consistency with the added quinoa.

1 Comment

Filed under Catch-all

Liege Waffle Update

DSC_5129

The Liege Waffle recipe that I had posted (click here), while good still left something to be desired. The waffles were simply too dense. The waffles we had in Belgium were much lighter. So the quest continued. However, one of Baker Bettie’s comments on her original recipe got me going in a different direction. What she had mentioned is that she took a sweet, yeasty bread recipe and modified it.

So, using the trusted King Arthur Baking Cookbook, I went ahead and used a Cinnamon bread recipe(without the cinnamon) and threw in the broken sugar cubes at the end. This time the results were MUCH better. The waffles were lighter and had close to the right consistency.

Here is the recipe.

INGREDIENTS (for about a dozen waffles)

3 cups unbleached all-purpose flour

1/2 cup sugar

2 tsp instant yeast

1 tsp salt

1 cup warm milk

1/4 cup melted butter

1 large egg

1 tsp baking powder

3 oz sugar cubes roughly broken up

STEPS

  1. In a large bowl, mix the flour, sugar, yeast and salt.
  2. In another bowl whisk the milk, butter and egg.
  3. Combine the wet and dry ingredients and let the mix rest for an hour.
  4. Add the baking powder and put it in a bowl and cover with cling wrap for another hour or so.
  5. Add the broken sugar cubes.
  6. Make golf ball size balls and with the waffle iron set to medium heat, make your waffles.


Leave a comment

Filed under Catch-all

Liege Waffles aka the “Cakey” Belgian Waffle

Liege Waffle

Liege Waffle

Well known for their chocolates and waffles, Belgians certainly seem to have a sweet tooth. A trip to Brussels in June this year confirmed that reputation for me (check out the posts on Belgium chocolate here).

While it is somewhat easy to get access to Belgian chocolate in the US, Belgian waffles are a different story. What passes for a Belgian waffle in the US is somewhat divorced from reality. For the uninitiated there are essentially two types of Belgian waffles – the Brussels waffle and the Liege Waffle. While both are yeasty and cakey, Brussels waffle is usually lighter and rectangular. This is the kind that is usually served with powdered sugar, strawberries and cream. The Liege waffle is denser and uses Pearl Sugar that caramelizes when it is being made. The result being a sweet waffle, that has a nice crunchy coating of caramelized sugar on it. Here is a good resource on the difference between the two (click here).

Given how much we enjoyed our Liege waffles while in Belgium, I set about trying to recreate it when back stateside but no luck. I knew that caramelized sugar was key but I just couldn’t figure out how to get the right sugar to caramelize and when to incorporate it into the recipe. The second big mistake I was making was trying to make the Liege Waffle from a batter (the result were still good – click here). What I realized is that you need a dough, not batter to get that cakey goodness. Many failed experiments and Google searches brought me to Baker Bettie and her Liege Waffle recipe (click here).

Here was something that finally made sense. So I tried the recipe and I am happy to report, it worked quite well. It is a smart recipe that uses sugar cubes instead of Pearl Sugar and you definitely do end up with a nice caramelly crust. The only thing I did not like was that the waffle was a little more dense than I would have liked. More experimentation is needed there. NOTE: I did not use a mixer, since I don’t have one. I used my hands and I  used half the sugar cubes the recipe called for –  it seemed to work well.

1 Comment

Filed under Catch-all

Cheese Tomato – a taste of Roorkee

Cheese Tomato

Cheese Tomato

I went for undergrad to an institute in a small town in Northern India – Roorkee. Our idyllic campus was located close to the foothills of the Himalayas (we could see snow-capped mountains on clear days from our campus) and was home to our institute (the oldest engineering college in India, now IIT Roorkee), the Irrigation Research Institute and a large Army cantonment. That’s it. Nothing else. The reason for this town’s existence were these three institutions.

While it made for a near-utopian existence, Roorkee wasn’t exactly an epicurean paradise. There were, however, a few shining points of light. Bhatia’s Bun Omelette – imitated often, never equaled (a version here), and Cheese Tomato were two of them. Cheese Tomato, a variation of Paneer Makhani (a version here), was a staple at pretty much every restaurant in town. Though I have traveled far and eaten plenty since my Roorkee days, the taste of Cheese Tomato has remained with me and one I have never been able to replicate, till now.

Recently an old friend and excellent cook, Hani Gupta, posted a recipe for Roorkee-style Cheese Tomato. As inclined as I am to never following recipes exactly, I decided to follow this one to the letter to see if I could recreate the taste of my youth. I am happy to report the recipe comes pretty darn close to the Cheese Tomato I remember. So without further ado, here it is.

INGREDIENTS (for 8-10 people)

1 lb paneer (cut into triangles about 1.5 inches on 2 sides and 1/2 inch thick)
1 Tbsp grated paneer (for garnishing)
2 Tbsp vegetable oil
2 Tbsp butter (or ghee)
1 large or 2 medium onions (peeled and cut into 1 inch pieces with layers separated)
1 Tbsp heaped ginger garlic paste
10-13 medium tomatoes – about 2.5 – 3 lbs. Use Heirloom tomatoes if you can for better flavor. Blanched, and chopped into 1 inch chunks.
½ cup low fat milk (heat the milk just before adding)
1 tsp garam masala (or to taste)
2-3 tsp Kashmiri chilli powder (for color) – totally optional
Red chilli powder (optional, to taste
1 Tbsp Kasoori Methi (crush Kasoori Methi well, you will need 2-3 Tbsp kasoori methi to get 1 Tbsp powder. Sieve the powder to remove the stalks)
Salt (to taste)
2 Tbsp honey (or to taste. This is the secret ingredient for that restaurant quality flavor)

STEPS
1. In a thick bottom karahi (wok) or saucepan, add 1 Tbsp oil and heat.

2. Add ginger garlic paste and fry for a few seconds. Don’t let turn pink. This is just to cut the pungency of garlic.

3. Add onions and fry till they sweat to translucence.

4. Add chopped tomatoes, and stir.

5. Add cashews, a little salt and cook covered till the tomatoes and onions are well cooked but not pink. Ensure that there is no raw smell of ginger, garlic, onion or tomato at this point. It doesn’t matter if you don’t see the oil separating out yet.

6. Let the cooked mix cool down and then grind into as fine a paste as possible. Make sure you don’t see any tomato seeds in the paste.

7. Heat another tablespoon of oil and let it warm. Then add butter. This will prevent the butter from turning brown. To this add red Kashmiri chilli powder. This will give a beautiful red color to the oil. NOTE: If your tomatoes are of good quality you don’t need to add color.

8. Add the ground paste and stir well. If you are adding the canned tomato sauce, add it now. Tomato sauce can be a little sweet or tart depending on the brand.

9. Add salt, stir well and cook well covered on medium, making sure the paste does not stick to the bottom. When the gravy is cooked, add the honey and Kasoori Methi and stir again.

10. Add Garam Masala and Red Chilli powder.

11. Now add hot milk and incorporate well into the gravy. Remember not to boil or the milk may curdle.

12. Finally add the Paneer pieces and gently fold in the gravy so as not to break the Paneer pieces.

13. Cover and cook for another 5 mins on sim. Serve garnished with grated paneer (and more melted butter if you want, but I don’t). This is an excellent accompaniment with an Indian bread of your choice or some Basmati rice.

Leave a comment

Filed under Indian

A Lentil loaded Veggie Burger

Lentil loaded Veggie Burger

Lentil loaded Veggie Burger

If you are going to experiment, be prepared to fail. A lot. And so it was with this particular version of veggie b’s. While not exactly a failure, it wasn’t a resounding success either. The burgers were perfectly edible but not even close to the Veggie Chop inspired Burgers that I make (recipe here). But I am getting ahead of myself. Let’s rewind the tape a little.

It was another day of meal planning and thinking about what to make for dinner. The larder was somewhat low on produce since we hadn’t been to the grocery store recently but there were multiple types of lentils and a potato. So as the saying goes, when life gives you potatoes and lentils, you make veggie burgers. The recipe is below. The good part – they were super easy to put together and healthy. The bad – they were somewhat bland.

INGREDIENTS (for 8 patties)

1/4 cup Toor Daal (Pigeon Peas)

1/4 cup Chana Daal (Split Peas)

1/4 cup washed Mung Daal

1/4 cup Green Lentils (Masoor with skin)

1 medium potato

For the masala

1 dry Red Chili

1 Tbsp Coriander seeds

1 Tbsp Cumin seeds

1 Tbsp Fennel seeds

1 tsp Black Peppercorns

1 inch stick of cinnamon

Salt to taste

To assemble

1 egg

Panko breadcrumbs

Oil to pan fry the patties

STEPS

  1. Boil the Daals and the Potato till cooked. I used a pressure cooker.
  2. Dry roast the masala (without the salt) and grind to a powder.
  3. Mash the Daals, peeled potato and the masala. Add salt to taste.
  4. Break and incorporate an egg into the mash (to hold the patties together).
  5. Make patties about 3 inches in diameter, cover with breadcrumbs, pan fry and you are done!

1 Comment

Filed under Catch-all

Eggplant Schezuan Style

Eggplant Schezuan Style

Eggplant Schezuan Style

As somebody who loves to cook, if there is one thing that becomes glaringly obvious pretty quickly, its that things that look simple, aren’t. So it has been for me with making any kind of stir-fry. They are devilishly hard. They look simple and easy to put together and while it is true that you can put a palatable concoction pretty simply, getting the flavors and the crunch right is very, very difficult. The primary reason being that different ingredients have different rates of cooking but since you are making a stir fry on high heat, getting the timing right is tricky, since you have very little time to play with. One tip that seems to work well is to individually prep the ingredients and then bring them together in the sauce. And that is what seems to work beautifully with this dish.

After much trial and error, I think I have finally figured out how to get this one right. The trick is in preparing the eggplant and Tofu separately. The best part is that it is something that can be done fairly quickly and makes for a great weekday dinner. And so, without further ado, I give you Eggplant Schezuan Style…

In the wok - Schezuan Style Eggplant

In the wok – Schezuan Style Eggplant

INGREDIENTS (for 4)

1 large Japanese Eggplant (about a foot and a half long) – use two if needed

Salt

Pepper

Sesame Oil (or Vegetable Oil)

Extra Firm Tofu – half a block – cut into small cubes

4 cloves minced Garlic

Soy Sauce

3-4 Green Onions – the whites sliced thin and the greens sliced into 1/2 inch pieces – keep them separate

1 dry red chili

For the sauce (mix all the ingredients in a bowl)

1/2 cup soy sauce

1/4 cup white vinegar

1 cup water or vegetable stock

Sriracha sauce to taste – because Rooster Sauce is good in everything – start with 1 Tbsp

1 Tbsp Corn Flour

Brown Sugar to taste – start with a couple of Tbsp

STEPS

1. Slice the eggplant into chunky diagonal slices and massage some salt and pepper into them.

2. In a skillet heat some oil and sear the eggplant on both sides. You want them to just start softening but not be over cooked – a good idea is to watch the purple skin turn light, that is a good sign that you are done. Keep aside.

3. Heat some more oil in the skillet and saute half the garlic, you can also throw in some chili flakes to make some chili garlic oil.

4. Add the Tofu and pan fry on high heat. Add some Soy sauce to glaze the Tofu. Keep aside.

5. In a wok, heat about a Tbsp of oil on high heat. Add the remaining garlic and red chili. After a few seconds add the whites of the onion.

6. Let the onion just start to brown and add the sauce. Let it come to a boil.

7. Throw in the prepared eggplant and Tofu once the sauce has started to thicken, and bring everything to a boil.

8. Adjust seasoning and serve on boiled rice topped with the greens of green onion.

2 Comments

Filed under Indian Chinese

First attempt at Veggie Ramen

Veggie Ramen

Veggie Ramen

Ramen. The word usually evokes one of two responses in people. One, if you grew up with instant noodles, it reminds you of boiling water in your dorm, bachelor pad, excuse-for-a-kitchen, and then throwing in a packet of dried noodles with seasoning from a packet to create a quick, but rather dubious meal. Two, it evokes memories of a flavorful noodle soup where the broth has been lovingly prepared, sometimes over days, with fresh, flavorful fixings added for good measure.

It is the latter that is the subject of this post. Having turned vegetarian long before I discovered Ramen, I never really had a chance to taste it in its full glory (traditional Ramen broth is usually some kind of a meat broth – Beef or Pork are commonly used as the base). However, on a date night with the wife recently, I had the opportunity to try Ramen with a Curry-based broth at Tanoshii Ramen in Dallas. It was excellent and completely in a different league from the Maggi Two Minute Noodles that I grew up with. Tanoshii also had excellent Braised Shiitake Steamed Buns (which I need to try and recreate soon) but I digress.

Wanting to try and make Ramen for me was a little like a blind person making a clay sculpture of an object they have only heard about but never seen. So while the dish was a success in our house, I have no idea if it tastes anything like good Ramen is supposed to taste like. In any event, it was a good Noodle Soup. I apologize I don’t have exact measurements for anything since I was winging it but I have put down what my thoughts were and the ingredients I used.

THE BROTH

1. Having a jar of Thai Green Curry Paste in the fridge, I went with that as a base. I heated some oil in a saucepan and added a couple of teaspoons of the paste till it started to give off fragrance.

2. I then added a lot of water (about 3-4 cups) and a cube of veggie bouillon and let the whole thing come to a rolling boil.

3. Then went in some chopped Maitake mushrooms and a couple of pieces of crushed garlic and some good ole Rooster sauce (Sriracha).

4. I grated some ginger for good measure, reduced the heat and let the concoction cook for a long time (30 mins or so).

5. Then I added some more water, some hard Tofu, a chopped up Heirloom Tomato and raised the heat for it to come to a full boil.

6. After the Tomato had started softening, I added some torn Spinach leaves and adjusted the salt.

THE NOODLES

1. Having no clue on what type of noodles to use, a Google search suggested using “Japanese style, wheat based, straight noodles”. So Somen noodles is what I went with.

2. Cooked in boiling water, you want to slightly undercook them since they will continue to cook in the broth.

THE ASSEMBLY

1. In a bowl went a handful of cooked noodles, topped with broth and lots of the veggies and Tofu.

2. Some finely chopped green onion went on top along with a twist of lime.

THE VERDICT

The family liked it and thought it had good flavor but didn’t think it was hot enough (take this with a pinch of red chili powder – we are spice hounds in our family). Adding Sriracha post-facto didn’t cut it since the flavors of the broth aligned more with red curry paste type sauce. This is an area to be worked on in Ramen V2.0.


Leave a comment

Filed under Catch-all

Lauki Sabzi – the bane of my existence

Lauki Sabzi with Roti

Lauki Sabzi with Roti

This is another one from my childhood. My parents love Opo Squash aka Lauki aka Doodhi. Couple that with the fact it is pretty easy to make, North Indian style Lauki with a Tomato gravy was often on the dinner menu. I hated it. Now, that I am older, and don’t get to eat it as often, I actually quite enjoy it. Funny how time changes things.

Anyway, with half an Opo Squash left in the fridge (after the other half was used to make Sambar), I decided to make Lauki Sabzi with Grilled Tandoori Roti for dinner. Given the fact, this is your standard issue dish from North Eastern India, I was pretty confident it would be laughed at by my wife who thinks that the UP(Uttar Pradesh – a state in Northern India) cuisine is completely bland (she is from Gujarat and even I have to admit, there is some truth in what she says). Anyway, 20 minutes and one whistle of the pressure cooker later, I was pleasantly surprised to see what came out, and even more surprised to learn that my wife and my picky kid both enjoyed it. So here goes, this is one easy dish to make.

INGREDIENTS (for 4)

1-2 Tbsp Cooking Oil (I use EVOO)

1 tsp Cumin Seeds

1/2 White Onion – diced

1 cup Chopped Tomato

1 Tbsp Ground Coriander

1/2 a medium sized Opo Squash or Lauki (about 6-8 in length) – peeled and cubed

1/4 tsp Red Chili Powder

Salt to taste

STEPS

1. Heat the oil in a pressure cooker. If you don’t have one, not to worry, just use a standard heavy bottle saucepan.

2. Add the cumin seeds and wait for them to sputter.

3. Add the onion and fry till they start to brown.

4. Add the tomato and fry for 5-6 minutes.

5. Add the spices and the squash and 1/2 cup of water.

6. If you are using a pressure cooker, cook for one whistle. You are done. If you are not, cover the saucepan and cook till the squash is soft. You may want to add a little water (about 1/2 cup) in case it starts drying up.

7. Serve hot with an Indian bread of choice.

2 Comments

Filed under Indian